Wednesday, June 30, 2010

Chocolate Fruit Pizza~

Planning a BBQ for the 4th?? Yep, me too! :) I'm also gonna be making one of these.....YUMMY!!


Chocolate Pizza
1 pizza base (this recipe is easy)
1 block Cadbury Dairy Milk Chocolate
1/2 packet Nestle milk chocolate melts
1 bag marshmallows, halved
1 banana, sliced
1 punnet strawberries, sliced
peanut M&Ms

Basic Pizza Dough:

1 3/4 cup warm water
1 (1/4-ounce) package active dry yeast (recommended: RapidRise)
2 teaspoons salt
4 1/2 to 5 cups bread flour
3 tablespoons olive oil, plus more for bowl
Cornmeal, for pan

Preheat oven at 450 degrees F.

Measure out 1 3/4 cups warm water. Sprinkle the yeast on top of the water and allow it to activate, about 10 minutes.

Put the salt and 2 cups of the flour into a food processor. Pulse 5 times to blend. Pour in the yeast and water and pulse 5 times. Add the olive oil. Add the remaining flour 1 cup at a time, pulsing and scraping the sides of the bowl until well blended. As soon as the mixture is combined, dump it out onto a well-floured board and knead for 15 turns, until the dough is smooth and elastic.

Place the dough in a greased bowl and turn to coat all sides. Cover with plastic wrap or a tea towel. Allow the dough to rise in a warm place for about 45 minutes, until doubled in size, then punch it down. Divide it in half; each half will make 1 (12-inch) pizza.

Place on a cornmeal-dusted pizza stone, pizza pan, or cookie sheet. Roll up edge slightly to create a ridge around the pizza. Bake for 16 to 18 minutes, or until crust is light brown.


Melt chocolates together and spread over base.
Sprinkle with halved marshmallows.
Place in moderate oven for about 5 minutes or until marshmallows begin to melt and are lightly toasted.
Remove from oven and immediately sprinkle with fruit and M&Ms.
Serve immediately!


Tuesday, June 29, 2010

Make your own Pattern Tutorial~

Have you ever wanted to make something and couldn't find a pattern? OR are to cheap {like me} to pay 7 or 9 or 15 dollars for pattern in the store or online? Well my mom taught me a secret. She showed me how easy it is to make a pattern from something you already have. Like cute little ruffle pants or shorts for my little girl. She has a few outfits that are my absolute favorite with ruffle pants or shorts. And when my mom showed me how easy it is... i was VERY excited. So i thought i would post a tutorial to show you ladies just how easy it is. That is if you sew! :) And even if you don't...maybe this will get you started. Just a warning...this is a long post with lots of pics. :)

I looked up and the kids were doing this......


I guess they were starved for television since i don't turn it on much in the summer time.
Look at those chubby little legs! ;) Don'tcha want to just pick him up and squeeze him? hehe!! And yes that is our livingroom floor waiting to be refinished. And no we don't usually have cords laying around and tv armoirs open but the hubby is still working on some stuff back there. Messy messy....but just keeping it real for ya! Anyway...i took this time to do a quick project.


I got this SA-weet little outfit online a few weeks ago. It was originally an $90 dollar outfit and i got it for $20!! I got it a size bigger cause it's gonna be a christmas gift for little miss. Don'tcha just love the pink smocking against the brown??!! Just GAW-jous!

Here are the cute-e-patootie shorts that go with it. I just love little ruffle shorts. Gotta make a few more for summer. :) This is what inspired me to make a pattern and tutorial.

Here is the list of supplies of what you will need:
Pants or shorts
Scissors
Roll of Brown Mailing Paper
Pencil {i used a pen cause that is all i could find}
Straight Pins {make sure to use these...i didn't cause of time}
Measuring Tap

Roll out your mailing paper.

First fold your shorts (or pants) in half so that the back seam is to your right. {see where the crotch area sticks out alittle}. This is how to lay pants to get that double cut. This is were you need to start getting out your straight pins. Lay the shorts out and start to pin the bottom just right above the ruffle. Put a pin about every 2 inches. This will keep your shorts from moving during the tracing of the pattern. Also...i noticed in the picture that i didn't turn the shorts inside out....you want to do this. It will give you a better outline. I have done this before and knew what it should look like and was able to adjust my copy. But for first timers.....turn it inside out. SORRY about that!! :-O


Start at the bottom right and trace/outline your shorts. Now make sure to give yourself a half inch for the seam. See how i didn't trace right up against the fabric. Also make sure to stretch out the elastic waist so that you get the "true" measurement of the waist. You might want to enlist the hubby for alittle help on this. :)

RUFF...but finished pattern. I like to mark where my seam will be.

Make sure to also give yourself atleast an inch...maybe 2 for the elastic waist band. See where i added extra length.


I also write front and back and how many pieces to cut out.. {just like a real pattern}.

Ok...now the left side is where your fabric will be folded {doubled} for cutting.


Just cut along your marks....maybe alittle better and straighter than your marks....haha!
TA-DAAAA!!! You have a pattern!!


Now for your ruffle. Sorry i didn't snap a pic of me doing this. Kids were not watching Dora at this point and i forgot. Just lay your pants back down on the paper. Making sure to do this where you have room for a long strip.
Now measure the length and double it { you will need the extra length for the pucker of the ruffle} This is your "Ruffle" pattern.

Now measure how long you want the ruffle {width of the ruffle}and double it too. You are going to want to fold the fabric in half for this cause it gives it a more finished look. Also make sure to give yourself an extra half inch for the seam.

See the seam.


And there you have it. A pattern!! I will be showing you how to use that pattern soon. Maybe that will help you to understand some of the crazy markings {if you do not sew}. :)


Monday, June 28, 2010

Busy Weekend and a Little Bit of Red-White & Blue~

Friday was a good day. I finished up the Kitchen! I have EVERYTHING that belongs in the kitchen in the kitchen. You see...when we moved and started this house remodel the hubby gave me a "guesstimation" of when we would get to the kitchen remodel and how long it should take. So when we moved in and had this plan i only unpacked what i thought we needed till the remodel. That means we had like 15 unpacked boxes of Kitchen. And THAT was driving me loco!! Well we have been in our house for almost a year now and well the kitchen is no where near being done NOR is it on the list of things to do in the near future. So something had to be done. I unpacked everything and pulled everything out of the cabinets and got started. I worked and worked till the kitchen was done...organized and "decorated". Now i actually enjoy being in there. :)

Mid-day Friday i hit up a yardsale. JACKPOT! Tons of boy clothes...new or practically new. CUTE, Cute, cute stuff. I got some SA-weet deals. Mostly winter items. But here is what i got {sizes range from 18 months to 3t} : 4 pair of PJ's, 4 button up short sleeve tops, 5 button up long sleeve tops, 2 sweater vests, 5 sweaters, 4 pair of dress pants, 2 pair of jeans, 2 pair of shoes, 2 pair of shorts, swim trunks, couple of shorts outfits and a BLUE umbrella stroller. Grand total of 50 dollars. I say that is awesome for expensive name brand clothes. AND the hubby was happy.

Saturday came and the hubby loved what i did in the kitchen so much...he thought we should go down to the bonus room and do the same thing!! Our bonus room is another room in the house that is packed full of things that are still packed from the move and/or just down there cause we don't have the room it goes in remodeled. We worked hard but it still isn't done. So that is what i will be working on today. Nothing like seeing all your "JUNK" everywhere and not having a home for it to go to......Hubs is going to have LOTS to take to Goodwill today when he gets home. Cause i'm done looking at it!!

I don't know about you, but I am getting excited for the upcoming weekend - I just love the 4th of July! Great food, great company and a great day to celebrate...or weekend, right? Here area few photos just to get you in the mood.


Pics are via Martha Stewart & Country Living


This week i'm going to try to post things that are red, white & blue~

Tomorrow i have a tutorial for you :) Till then ...HAVE A GREAT MONDAY!

Friday, June 25, 2010

Tips for Child Photography....

I do consider myself a Photographer. It is a passion and hobby of mine. I've done Senior Portraits, Pet Portraits, Babies, Kids, Family, Landscape, Bridal and even a few Weddings. And "Pre" kids i had quite the business going. After my daughter was born i had my very own model :). HEAVEN! Camera in hand 24/7!! I have enjoyed each milestone in my kids life and also my photography. I say that because with each age....photography {pictures of any kind} can be a challenge. But with trial and error i have learned what works for me. Today i would like to share some of my tips. They are no secret....photographers everywhere use some of these same techniques. But i thought i would share what i use when trying to capture a great photo of a baby or child.

Tip 1: Get down to their level. Taking photos of your baby from their eye level will illustrate the baby’s perspective, rather than the adult’s.

Tip 2: Get Close. Taking close up photos of your babies face will capture more detail and emotion and have wonderful results. I ALWAYS get as close as possible. Less distraction with a background. This is also good for those shots of itty bitty feet and hands. BUT when i say get close...i don't mean put your camera 2 inches from what you are photographing. Use your zoom. The farther away from the direct flash the better. I PROMISE!

Tip 3: Use natural light whenever possible. There are 2 times of the day that produce the best light. Early morning just after sunrise or just before sun set. Bright mid-day light can produce shadows or cause your subject to squint.

Tip 4: Eliminate Background clutter.
If there are too many distractions, the viewer’s attention will be pulled away from your baby.


Tip 5: Take out the color. Babies can often look blotchy. Black & White softens the image and takes away some of the noise.


Tip 6: Morning Photo shoots work best for babies and kids. I have noticed kids are less cranky before 11:00.

Tip 7: Try different angles....we all have a good side. :)

Tip 8: Instead of having a kid say "CHEESE" which always ends up with a crazy smile...try having them say "ICE". It gives you a more natural mouth.

EVERY parent on the planet loves to take pictures of their kids. I hope these tips are helpful.

On that note i'm going to bid you adieu! I got started on my kitchen/dinning room clean up yesterday and pulled absolutely everything out of the cabinets....EVERYTHING! The hubby came home and was NOT impressed! :P haha! I have gotten rid of tons of things that we just don't need. AHHH...it feels so good to get out the "junk" in my life! I still have about 2 hours of work to do today on that disaster and i want to get that done this morning so that i can start my weekend.

HAPPY FRIDAY!
xoxo

*****************************************************
Don't forget about the give-a-way....6 more followers to go!! :)

Wednesday, June 23, 2010

The BREAKFAST DOG....

Breakfast is sometimes hard, you want something easy, quick, and healthy. The Breakfast Dog has been a favorite around here for awhile. It's pretty filling and Yummy too.... :)


Banana Dogs:Ingredients:
Hot Dog Bun
Banana
Peanut Butter
Wheat Germ or sunflower seeds (optional)

Strawberry JamDirections:
Spread hot dog bun with PButter and sprinkle wheat germ on top. Top with a banana and jam "ketchup". Yum!

What do your kids like for breakfast? If you have a super cool snack that your kids love to have please share... :) I love new ideas!

Monday, June 21, 2010

Monogrammed Coasters....

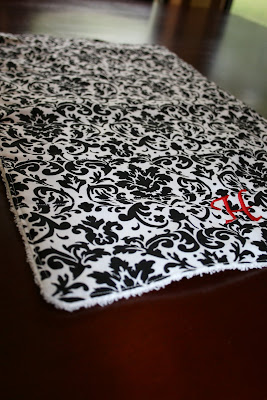
Last week i showed you the Dish Mat that i made {don't forget the give-a-way when i reach 15 followers}. :) While i had the black and white damask fabric out {i know you are sick of seeing this fabric} i also tried my hand at making some coasters for my new side tables in the living room. And i just love how they turned out!


I had seen some fabric coasters in a small boutique one day and i just knew that i could make some myself. And for less than what they wanted for them {$20.oo for 4}! So i already had the b/w damask print out and i found some red corduroy material {love me some red accent color}. I cut my squares of the b/w and sewn some terry cloth to that side. While i was at it i went ahead and "quilted" that side. Then i took my red corduroy and Monogrammed that side. So now i have reversible coasters!! Pretty SA-weet! I'm thinking MORE christmas goodies!! These would go great with the dish mat! What do you think??

Hancock Fabrics SALE....

It is no secret that i love Hobby Lobby. But did you know that i also LOVE Hancock Fabrics! I had to make a quick trip to town today and i stopped at Hancocks cause i had gotten their new mailer. Boy was i glad i did. And i wanted to share that with you. I just love passing on where to find good deals. If you live near one you will want to go check it out. They are having an AWESOME sale. I had $8.00 cash on me and i was determined to spend it...HA! Actually i might be going back...but today i only spent 8 dollars. I found 4 new patterns that struck my fancy. 2 are purse patterns, 1 is a few cute little outfits for little girl and 1 has patterns for storage baskets and round foot stools that i plan on making into beanbags for the little ones. :) I'm so excited! They were just 99 cents each!


I also found some fabric that is so cute and i already know what i'm going to make with it. :) Can't wait to share that with you. The fabric was only $1 a yard. Then i found a yard of plastic for my eye spy bags that i love to make....and it was only $1.00!!! So if you love to sew or quilt or craft...now is the time to check out your local Hancock Fabrics.


While my family was in...my mom taught me how to use my new serger machine. I have wanted one for so long. And now that i have one some of my sewing projects will look so much better. So don't be surprised if you see alot of sewing projects on here in the next few weeks. :)

Happy Monday....

XOXO

Sunday, June 20, 2010

HAPPY FATHERS DAY!!

I just want to say Happy Fathers Day to a very special Dad! My children have such a good and loving daddy. They are so blessed. We love you!! :) I couldn't have asked for a better father to my children.

Thursday, June 17, 2010

DISH MAT GIVEAWAY.....

It has been a very rainy day here in the south. I got my {week #2} craft organizing project done for the day. Feels good! Also accomplished cleaning the kitchen and living room. I have family coming for a visit later in the week. So very excited about that. :) I was putting some dishes away and was thinking about how UN-attractive my dish cloth looks under my metal "thingy" that i air dry some things on like sippy cups and bottles and certain coffee cups. So i looked to my Box-O-fabric and actually pulled out the same material i used for the "mommy & me" skirts. I love Black and white and also i love the "Damask" print. Used some red for the monogram {cause you know i love everything personalized}. I loved the way it turned out. So much so that i'm going to be making another one or two or more. I think these would make great gifts! It spruces up the ol' kitchen counter and personalizes it with something functional yet CA-ute!


I used 100% cotton terry cloth for the under side.

You know me....Personalization, personalization, Personalization!!! :-D


I think it turned out fabulous!

In it's home....please excuse the horrendously tacky tile in the background. Our kitchen hasn't been remodeled yet. :( But this new addition does make it look alittle better.


SO I would like to host a GIVE-A-WAY! I have been wanting to do one of these ever since i started my blog. Give-a-ways are always fun right? Here are the rules. Pass the word on about High Heels and Sippy Cups to some of your friends and bloggy friends out there. Once i get 15 followers i will be giving away one of these Dish Mats. This give-a-way is open to followers only. The winner will be chosen via name in a bowl and whoever my little girl pulls out of the bowl will receive a Dish Mat! :)

Wednesday, June 16, 2010

THE ROAD.....


Tear Jerker ALERT!!!

Ladies, i just got finished watching THE ROAD. I have deemed it the saddest movie on the PLANET! So very heart breaking. BUT it was a very good movie i would highly recommend watching it. Just make sure to have tons of tissues around. I had to stop the movie a few times just so that i could dry my eyes. I did plan on posting the trailer for this movie but it just wasn't good. It didn't show the movie in the right way. In fact it might even turn you off from watching the movie. SO...watch the movie...don't watch the trailer! HA!

Monday, June 14, 2010

Mommy & Me...

I'm so excited to share this with you. Friday i finished up something i have been wanting to make for my daughter and myself. I had some fabric that i love on hand and little miss said "Yes momma i like it"...so i sat down at naptime and made us these......

Mommy and Me skirts...aren't they so cute!!?? So Sunday morning i told her i had a surprise and that i had made her something. I had already gotten dressed and when i brought her her clothes she quickly noticed that she had a skirt like mommies...she loved it. She said SKIRT! :) She couldn't get it on fast enough. It was so cute...she showed everyone that we had on "skirts". I'm definitely going to have to make us another set. Funny story to go with this project. I thought i had enough elastic for my skirt but turned out that i didn't. Sooooo i was looking around trying to find an alternative. Then i saw were the hubs had went through his "undie" drawer and pulled out some that were trash worthy. Yep, i took the elastic off of some "Calvin's" and totally used it. :-O...Gasp! Oh well atleast it is designer elastic. HA!

I have had a few ladies ask me about making them some mommy and me skirts. So the sewing machine is out and i'm taking orders. If you are interested please email me and i will give you prices and time frame as to when i will get them mailed out to you.

Friday, June 11, 2010

TGIF...

It is Friday and I'm so excited! We have big'ol plans to do ....NOTHING! HA! I plan on RELAXING this weekend. I have a few projects underway right now but I'm almost done so this weekend we can just do...not much of anything. I have been sewing some this week. I was itching to get alittle sewing in and started something that i can't wait to show you Monday so come back and check it out. :)

HAVE A GREAT WEEKEND!

xo

Wednesday, June 9, 2010

2 Rooms Down!

I got started in Little girls room Monday morning. I opened her closet and pulled EVERYTHING out. You would have thought it was Christmas she was so excited she didn't know where to start! At one point i think she had on like 3 different dress up clothes at the same time. HA! It was so cute. But the hard part was starting to put things back...she didn't like that one bit! I had 3 boxes on top of things so she wouldn't see what i was throwing in them. 1 was for pure trashed out items...broken toys and stained clothes. 2nd was for things that i could pass down to friends that have and or having little girls in the near future. 3rd was things that i could possibly sell. It took me wayyyyy longer than i planned on. But that is ok cause i wanted to be thorough. I did manage to finish before naptime! When they got up i made a B-line back in to finish up her room. It took me about another hour. I decided to go ahead cause she was having so much fun and i didn't feel like i was taking any time away from her or brother. When i was done SHE made us some "tea" and a chicken leg......hahahaha!! All in all it was a great day. Play time with the kids and 1 room and closet organized! I do have a few projects that need to be addressed in her room. I'm going to be painting a focal wall in her room. I love that her room is pink...but her furniture is creamy off white and it needs a darker color behind her bed. I will be bugging the hubby to help me with that soon...hehe! I also have some canvases that are screaming to be used...i do have an idea for those just above her kitchen. Anyway...so here are some quick pics to took before the kiddos were back in there UNdoing everything i just did!


Ok ladies...i know it doesn't look like i took everything out and organized...but i did. She just has alot of things that stay in her closet. I'm not one for a "Toy" room. I think if a kid has so much stuff that it requires a whole nother room in the house....that kid has way to much stuff...that is just me though...i may change my mind on this one day. We have a "Bonus" room in our house...but that room is going to be for the whole family. OK...back on track...so i do use the closet space in her room as storage...i do like the idea of rotating toys. This seems to give her a fresh look on things she has.

Here is the other side of her closet. I hate storing that baby swing. But as of right now...that is where it is going.

And here is her Armoire. I know, I know...she has way to many clothes. BUT in my difference...they are not all one size. I hung all the bigger sizes in here. Thanks to a good friend of mine my daughter will not need many more clothes till she is 5!! You know who you are!! :)


Yep, i know...that frame there needs some pictures in it....i keep forgetting to order the ones i took specifically for that.


This was mine. I have had it as long as i can remember. It plays ..."A few of my favorite things".


MY mother made the Raggedy Ann and Andy dolls for her for her first christmas. I LOVE THEM!!!

This was also mine growing up. His name is Robby. I carried him everywhere....

This dress was mine. I passed it down to my little girl. :) It still is the sweetest little dress i have ever seen.

Yesterday i cleaned baby boys room....it was pretty easy.


That red, white and blue afghan was made for the hubby when he was little by his grandmother.

That pink rocker is driving me crazy! I have to make new covers for those cushions soon!!

This was in my room when i was a baby.

This of coarse was passed down from daddy....luv it!!

Now i have the rest of the week to possibly finish some projects......

Monday, June 7, 2010

Week 1...

Sorry to be so boring! I will try to throw in some crafty goodness one day this week. Today is the start of my organizational journey {that is what i'm calling it anyway}. I'm actually excited to get started. I woke up and started my coffee and sat down in my NEW chair i got this weekend...more on that later in the week. HA! I'm going to start in Little girls room and i think i will start in her closet....that needs the most attention! I seem to not be able to help myself when it comes to her clothes. I LOVE to buy her sweet little dresses. If you know me you know i don't spend an arm and a leg on clothes. And when i find a good deal i grab it {but i found alot of good deals...ha!} So today...all i will do is her closet. She has the best closet between the kids rooms. She has 3 Shelves on each end of the closet plus the top shelf. I have these pics to show you of how much of a mess it is. I can't remember when i took these so they are not current...but you get the idea.

Right side....


Left side.

Ok...now that i see the pics i realize they were took right before i changed out winter and summer clothes. And what a MESS!! Just keeping it real ladies. So please don't judge to hard. :( Does anyone else let their kids closets get this bad? So i'm off to thoroughly organize and clean her closet. Wish me luck....and drop me a comment and let me know any secrets to how you keep your little ones closet clean. :) Have a great monday!!


avandia